Roasted Chicken and Butternut Soup

Hi, all! Long time, no post. Since my husband and I started eating a mostly Paleo diet last year, I just haven’t been as inclined to write. Most meals are simple foods, simply prepared (but delicious!). I definitely repeat recipes a lot these days, whereas I used to try something new almost every day. Still, I had a friend request dinner ideas recently, so I’ll try to get back into the swing of things. (And I make no promise that absolutely everything I post will be healthy. A girl’s gotta live a little!)

Since we’re having another snow day here in Denver, I thought it would be the perfect time to post Roasted Chicken and Butternut Soup from the October 2010 issue of Everyday Food. This recipe – like so many of my favorites these days – is what I like to call “accidentally Paleo.” It wasn’t created with the Paleo diet in mind, but the ingredients comply perfectly.

Roasted Chicken and Butternut Soup
Serves 4
Prep time: 15 min. | Total time: 55 min.

Ingredients:
4 bone-in, skin-on chicken thighs (boneless, skinless will work fine too)
1 medium butternut squash (about 2 1/2 pounds), peeled, seeded, and diced medium
1 small yellow onion, diced medium
2 tablespoons olive oil (or coconut oil)
Coarse salt and ground pepper
4 cups low-sodium chicken broth or water (I use Costco’s organic chicken stock)
1/4 teaspoon ground cumin
1/4 teaspoon ground coriander
1 to 2 tablespoons fresh lemon juice
Fresh cilantro (optional)

Method:
Preheat oven to 425°. In a roasting pan or rimmed baking sheet, toss together chicken, squash, onion, and oil; season with salt and pepper. Arrange in a single layer and roast until squash and chicken are cooked through, about 30 minutes.

Transfer chicken to a plate and let cool. Transfer squash and onions to a medium pot and add broth, cumin, and coriander. Bring to a simmer over medium-high. With a potato masher or back of a wooden spoon, mash some vegetables until soup is thick and chunky. (I just give it a few pulses with my immersion blender.) Discard skin and bones from chicken; cut meat into small pieces and add to soup. Stir in lemon juice; season to taste with salt and pepper. To serve, top with fresh cilantro, if desired.

roasted_chicken_and_butternut_soup

I do love this soup. It’s hearty and filling thanks to the chicken, but it certainly isn’t heavy; the squash and lemon create a light texture and bright flavor. This one of several recipes I make in big batches and then freeze individual portions for future lunches. (I’m no longer a Lean Cuisine addict – hooray!)

Recipe link: Roasted Chicken and Butternut Soup

Carrot Salad with Cumin and Garlic

Today’s recipe – Carrot Salad with Cumin and Garlic – has been in heavy rotation since I first discovered it back in August of last year. In its original context, it’s supposed to serve as part of an appetizer course for a Moroccan meal. I’ve been serving it alongside Roasted Beet Salad with Cinnamon and pan-seared chicken (occasionally with a green salad as well) for a perfect, easy, mostly make-ahead meal.

Carrot Salad with Cumin and Garlic
Serves 4

Ingredients:
5 large carrots (about 1 1/4 pounds)
4 tablespoons extra virgin olive oil (can cut to 2 tablespoons, if desired)
4 garlic cloves, crushed
1 teaspoon ground cumin
Salt and black pepper
Juice of 1/2 lemon

Peel or wash and scrape the carrots and trim off the tops and tails. Cut them in quarters lengthwise and then cut each quarter in half to produce sticks. Boil in salted water for 10 to 15 minutes, until tender but not too soft, then drain.

In a large skillet, heat the oil and put in the carrots, garlic, cumin, and some salt and pepper. Sauté on a medium-high heat, stirring and turning the carrots over, until the garlic just begins to color.

Sprinkle with lemon juice and serve cold.

Source: Arabesque: A Taste of Morocco, Turkey, and Lebanon

Carrot Salad with Cumin and Garlic

This is one of those “so simple but so good” recipes. I love the tender carrots mixed with cumin, lemon, and lots of garlicky goodness. While this isn’t first-date food (unless your date is into garlic!), this dish is perfect as part of a make-ahead meal or a picnic because it can be prepared days ahead and is meant to be served cold or at room temperature.

Speaking of garlic, I’ve done a fair amount of experimenting with the garlic in this recipe because I wasn’t initially sure what “crushed” garlic was. This time, I smashed whole cloves with the side of my santoku knife and stirred them in whole. That produces a milder garlic flavor. I’ve used jarred minced garlic in a pinch (works fine), but my favorite preparation in terms of flavor and texture is coarsely chopped garlic. The only less-than-great result I got was when I used my garlic press; with four cloves, the garlic flavor was totally overwhelming. If you want to press your garlic, I’d recommend cutting it back from four cloves to two.

Homemade Marshmallows with Chocolate and Toasted Coconut

My cousin has a daughter who was recently diagnosed with celiac disease, in addition to the nut allergy the family has been aware of for years. She’s adjusting well, and there are lots of great gluten-free products these days, but it’s still not easy for a kid to have to be so careful about the things that she eats.

Easter sugar cookies were our tradition previously, but this year, I wanted to make a dessert that everyone could enjoy. After carefully checking my list of potential ingredients to make sure there wasn’t any risk of gluten cross-contamination, I decided to pull out a marshmallow recipe I’ve used previously and then dip the marshmallows in chocolate and toasted coconut. They were a great hit with the children and the adults (and would have been with the family dog, had he succeeded in his quest) – a perfect mix of sweet, chewy, and crunchy.

Homemade Marshmallows with Chocolate and Toasted Coconut
Makes about 60 (depending on how you cut them)

Ingredients:
Vegetable oil, for brushing
4 packages unflavored gelatin (or 3 tablespoons)
3 cups granulated sugar
1 1/4 cups light corn syrup
1/4 teaspoon salt
2 teaspoons pure vanilla extract
1 cup confectioners’ sugar
2 cups sweetened flaked coconut (use unsweetened, if desired)
6 ounces semi-sweet or dark chocolate

To make marshmallows:
Brush a 9-x-13-inch glass baking dish with vegetable oil. Cut a piece of parchment paper large enough to cover the bottom of the dish and to overhang the longer sides. Place the parchment in the dish, brush with oil, and set dish aside.

Pour 3/4 cup of cold water in the bowl of an electric mixer, and sprinkle gelatin on top. Let stand 5 minutes.

Place granulated sugar, corn syrup, salt, and 3/4 cup water in a medium saucepan. Set saucepan over high heat, and bring to a boil. Insert a candy thermometer, and cook until mixture reaches soft-ball stage (238° at sea level, 228° at my house at 5900 feet, about 9 minutes).

Using the whisk attachment, beat hot syrup into gelatin on low speed. Gradually increasing speed to high, beat until mixture is very stiff, about 12 minutes. Beat in vanilla. Pour mixture into the prepared baking dish, and smooth the surface with an offset spatula. Set dish aside, uncovered, until marshmallow becomes firm, at least 3 hours or overnight.

Place 1/2 cup confectioners’ sugar in a fine strainer, and sift onto a clean work surface. Invert large marshmallow onto the sugar-coated surface, and peel off the parchment paper. Lightly brush a sharp knife with vegetable oil, and cut marshmallow into 1-inch squares. Sift remaining 1/2 cup confectioners’ sugar into a small bowl, and roll marshmallows in sugar to coat. Set aside.

To dip marshmallows:
Preheat oven to 350°. Spread coconut in a single layer on a baking sheet. Bake coconut until toasted and golden brown, about 5 minutes. (Watch carefully because coconut will burn quickly!) Place toasted coconut in a bowl and set aside.

Melt chocolate in a small bowl in microwave according to package instructions. (You could also melt chocolate using a double boiler, if desired.)

Dip one side of each marshmallow first in chocolate and then in toasted coconut. Place chocolate-side up on a rimmed baking sheet.

Once all the marshmallows are dipped, place baking sheet in refrigerator for 15 minutes to allow chocolate to set. Cover loosely with foil until ready to serve. Store leftovers in an airtight container for up to one week.

Marshmallow adapted from MarthaStewart.com

Homemade Marshmallows with Chocolate and Toasted Coconut

Holy cow, are these ever good. What really makes them awesome is the combination of the soft marshmallow with the crunchy, sweet coconut – it’s textural heaven. I love chocolate, so that certainly doesn’t hurt things either. They’re the perfect little size – just a bite, which is great for kids or adults who struggle with dessert guilt.  (I am not one of those adults.)

The dipped marshmallows are definitely best day they’re made, before they’ve spent any time in an airtight container. As we discovered in the backyard fire pit, they’re good toasted, too, though you have to be careful about the coconut catching fire. Never fear if you have leftovers… Even though the coconut lost its crunch in airtight storage, Dr. O still couldn’t stop eating them.

Moroccan Meatball Soup with Sweet Potato

When you make a recipe that’s a bit of a letdown, do you ever give it a second chance? Today’s recipe – Moroccan Meatball Soup with Sweet Potato – is one that I practically live on these days, but it almost didn’t make it to the “repeat recipe” pile after my first try.

When I first made this soup, I used a medium pot as the recipe suggested; in my opinion, at least, a “medium” pot has about a 3- or 4-quart capacity. Once I got to the second half of the recipe, though, and saw the mound of sliced sweet potatoes and carrots that I needed to add to the pot, I knew I was in trouble. Since there wasn’t much else to do, I pulled my 5.5-quart enameled cast iron pot out of the cabinet and forged ahead.

We had the soup for dinner that night. While Dr. O said he enjoyed it, I was less than impressed. Still, there was plenty left over for lunch, so we both dug in again the next day.

Overnight, something magical happened. The previously bland soup seemed so rich and flavorful. I think the seasoning in the meatballs – the majority of which I had lost when I had to switch pots – had a chance to seep into the broth, completely transforming the soup.

Since I was able to see the recipe’s true potential, I decided to give it another chance. Using the 5.5-quart enameled cast iron pot from the beginning this time, I was able to develop a gorgeous fond while cooking the onions and spices. I deglazed the pan with a bit of chicken broth later in the recipe so those delicious browned bits wouldn’t go to waste. In terms of flavor, it made all the difference in the world.

Moroccan Meatball Soup with Sweet Potato
Serves 4 – 6
Prep: 20 min. | Total time: 50 min.

Ingredients:
4 teaspoons vegetable oil
1 medium white onion, diced small
Salt and pepper
2 cloves garlic, minced
1/2 teaspoon ground cumin
1/2 teaspoon cinnamon
1 1/2 pounds 90% lean ground beef
2 medium sweet potatoes, cut into thin half-moons
4 medium carrots, thinly sliced
3 tablespoons tomato paste
7 cups chicken broth
Chopped fresh cilantro, for serving

Method:
In a medium pot, heat 2 teaspoons oil over medium. Add onion and cook until softened, 8 minutes; season with salt and pepper. Add garlic, cumin, and cinnamon and cook until fragrant, 30 seconds. Transfer mixture to a medium bowl and add beef. Using your hands, gently combine (do not overmix), then form beef mixture into 1-inch balls.

Add remaining 2 teaspoons oil to pot and heat over medium-high. Add sweet potatoes and carrots and cook until bright orange, 5 minutes. Add tomato paste and stir to coat. Add broth and bring to a simmer; cook until vegetables are just tender, about 5 minutes. Add meatballs and simmer until cooked through, 12 minutes. Sprinkle with cilantro to serve.

Source: MarthaStewart.com

My notes:

  • I used a large pot instead of a medium pot. (Lesson learned!)
  • I used olive oil instead of vegetable oil.
  • I used a 1.5-pound package of organic 85% lean ground beef from Costco for the meatballs. Since my meat had a higher fat content, I skimmed the fat from the soup at the end.  The easiest way to do this (once you’ve had your initial serving of soup, if you’re hungry), is to chill the soup in the refrigerator.  The fat will rise to the top and harden, and you can remove it with a spoon.
  • I used a mandoline to make quick work of slicing the sweet potatoes and the carrots.
  • In addition to seasoning the onion mixture in the first step, I seasoned the meatball mixture as well.

Image

This is such a great recipe! The meatballs and starchy vegetables make the soup so hearty and filling, and I love the Moroccan spice. Don’t skip the sprinkle of cilantro (unless you hate cilantro, of course); it adds a fantastic layer of flavor to the dish.

Since Dr. O and I try to avoid processed foods as much as possible, I make a batch of this every week (along with another dish, to keep things interesting). I freeze individual portions, and we put them in the refrigerator to thaw overnight for lunch the next day. It beats the heck out of a Lean Cuisine!

Recipe link: Moroccan Meatball Soup with Sweet Potato

Honey-Tomato Bruschetta with Ricotta

And I’m back! My blog absence is due, in large part, to the fact that my husband and I completed the Whole 30 in the month of January – no sugar, alcohol, grains, legumes, or dairy for an entire month. I really should have written about it on the blog, but all the recipe searching, planning, shopping, cooking, and cleaning took just about everything I had. Honestly, it wasn’t all that difficult since we enjoy lots of home-cooked whole foods as it is, but it was challenging to cook every single meal, every day for 30 days. (I had a couple of bad days that month and really didn’t feel like cooking, but Chipotle just wasn’t an option.) We even survived a family visit/trip to the mountains; I just cooked everyone’s food, and we stared longingly at the red wine.

We did it as a digestive investigation (as opposed to doing it for vanity, which is fine, too!), and I think our investigative purpose certainly helped us stick with it. For better or worse, we discovered that we both function optimally eating within the Whole 30 parameters, and dairy really isn’t Dr. O’s friend. Thankfully, none of the foods we eliminated and re-introduced made us sick, per se; we could just tell a difference in our energy levels, digestive function, and yes, bodily appearance when we put them back in. Our plan for now is to stick closely to the plan at home (though I won’t pretend we aren’t having any wine or dark chocolate), and not to worry so much at friends’ houses or restaurants.

Not worrying so much at friends’ houses is a good thing, because what is perhaps the best appetizer I’ve ever made came out of my recipe search for this month’s gourmet club meeting. Our theme was aphrodisiac foods, and I chose this recipe because of the tomato, basil, and honey elements. With its lush, creamy texture, I figured the ricotta couldn’t hurt either. Here it is!

Honey-Tomato Bruschetta with Ricotta
Serves 6
Prep: 20 min. | Total time: 1 hr., 45 min.

Ingredients:
2 pints cherry or grape tomatoes, halved lengthwise
1 1/2 tablespoons extra-virgin olive oil
2 tablespoons clover honey
2 teaspoons thyme leaves
1 teaspoon kosher salt
1/8 teaspoon freshly ground pepper
12 baguette slices, cut 1/2 inch thick on the bias
1 cup fresh ricotta (8 ounces)
1 tablespoon buckwheat or chestnut honey
6 basil leaves, thinly sliced or torn

Method:
Preheat the oven to 300°. Line a large rimmed baking sheet with parchment paper. In a large bowl, toss the tomatoes with the olive oil, honey, thyme leaves, salt and pepper. Scrape the tomatoes onto the prepared baking sheet and turn them cut side up. Bake the tomatoes for about 1 hour and 25 minutes, until they begin to shrivel and brown. Let cool.

Preheat the broiler. Spread out the baguette slices on a baking sheet. Broil for about 30 seconds on each side, until the edges are golden brown.

Spread the ricotta over the baguette slices and top with the slow-roasted tomatoes. Lightly drizzle the tomatoes with the buckwheat honey, sprinkle with the sliced basil and serve with additional buckwheat honey on the side.

Make ahead: The roasted tomatoes can be refrigerated for up to 2 days. Bring to room temperature before serving.

Source: Food & Wine

My notes:

  • Surely, part of the reason this tasted so amazing is because I made my own ricotta. I used Smitten Kitchen’s recipe with 1 cup of heavy cream and 3 cups of whole milk. Making ricotta is actually pretty easy and well worth the effort.
  • I made two separate batches of tomatoes over a couple of days, once with a light baking sheet and once with a dark one. The tomatoes on the light baking sheet were softer, and the tomatoes on the dark baking sheet were almost candied. Both were delicious.
  • Since I didn’t feel like tracking down buckwheat or chestnut honey, I used clover honey for the tomatoes and for drizzling (as did several of the recipe reviewers).
  • If you don’t want to make your own baguette toasts, baguette chips from the bakery area of the grocery store work just as well.

Honey-Tomato Bruschetta with Ricotta

This is one of those appetizers where people moan while they eat it. Seriously. The combo of crunchy bread, fresh and creamy ricotta, and sweet slow-roasted tomatoes is beyond delicious. The basil adds brightness, and the honey drizzle takes everything over the top. Plus, it’s totally gorgeous on the plate (far more than my photo shows).

I served this twice over the course of two days – once at gourmet club and once at my Downton Abbey supper club – and everyone raved. I’m going to make this again and again, but only when others are around for sharing.  It’s dangerously good!

Recipe link: Honey-Tomato Bruschetta with Ricotta

Chocolate Panforte Candies

Our gourmet club theme was really fun this month: lucky foods for the new year. We met last night and had a wonderful spread filled with all kinds of foods that should bring good fortune in 2013, including bacon jam (pigs symbolize progress and “the fat of the land”), smoked salmon dip (fish represent abundance), roasted grapes with rosemary (grapes are part of a Spanish tradition), Hoppin’ John risotto (black-eyed peas represent coins/prosperity), cooked greens (greens look like money), and honey cornbread (cornbread is the color of gold).

I was on dessert duty, and since there aren’t too many sweet foods that fall on the lucky list, I decided to explore the “round” theme for dessert. Round or ring-shaped foods represent prosperity (coins are round) and the idea of coming full circle. Bundt cake was a natural choice since it’s a popular ring-shaped dessert (I went with Martha’s Tangerine Cake with Citrus Glaze), but I wanted to add another element. Since chocolate and orange go so well together, I knew I wanted to make some kind of chocolate candy. Today’s recipe – Chocolate Panforte Candies – fit the bill perfectly. They pull together chocolate, orange, and several other unexpected flavors that work together wonderfully. Everyone liked the cake, for sure, but I think they loved these.

Chocolate Panforte Candies
Active time: 40 min. | Total time: 2 hours
Makes 14

Ingredients:
1/2 cup quartered dried black Mission figs
1/4 cup orange juice
2 tablespoons honey
1/2 teaspoon ground nutmeg
1/4 teaspoon ground cloves
1 1/4 teaspoons grated orange peel, divided
1/2 teaspoon ground cinnamon
2/3 cup (scant) hazelnuts, toasted
1 cup bittersweet or semisweet chocolate chips
14 standard paper muffin baking cups

Method:
Cook first 5 ingredients and 1 teaspoon orange peel in heavy small saucepan over medium-high heat until liquid forms thick syrup that coats figs, stirring occasionally, about 6 minutes. Remove from heat; mix in cinnamon, remaining 1/4 teaspoon orange peel, and nuts.

Melt chocolate in microwave-safe bowl on medium power until melted and warm to touch, stopping once to stir, about 1 1/2 minutes. Arrange paper cups on rimmed baking sheet. Spoon 1 mounded teaspoon chocolate onto bottom of each paper cup. Tap baking sheet on work surface to spread chocolate over bottom of cups. Top center of each with about 1 mounded teaspoon fig mixture. Chill until firm, about 1 hour. Peel off paper. Let chocolates stand at room temperature 15 minutes before serving.

Source: Bon Appétit, December 2008

My notes:

  • I chopped the figs instead of quartering them and chopped the hazelnuts instead of leaving them whole.
  • I found hazelnuts in the bulk section at Whole Foods. I roasted them for 9 minutes at 350°F and then rubbed the skins off before chopping them. Some skins didn’t rub off entirely, which wasn’t a big deal.
  • The recipe makes about twice the amount of topping that you need, so I would recommend halving the topping or doubling the chocolate.
  • The microwave instructions in the recipe won’t completely melt the chocolate. Just stir, stir, stir until the chocolate is smooth.
  • I’ve made these with both semisweet and bittersweet chocolate; Dr. O and I like the bittersweet the best.

Chocolate Panforte Candies

These candies are ridiculously good. Who knew figs and chocolate went so well together? The crunch of the hazelnuts is pretty special as well. Like one of the recipe reviewers, I was worried that the clove and nutmeg might be overwhelming, but everything blends together beautifully in the finished product. And I do mean beautifully… Both times I’ve served these, people wondered how I created such a gorgeous edge on these chocolates. Muffin cups work wonders!

These probably aren’t going to satisfy a crowd that wants Oreo balls and peanut butter fudge, but they’re perfect for foodies, adventurous eaters, or anyone who enjoys a little something unexpected. I’ll be making them again next December (if not sooner!) for sure.

Recipe link: Chocolate Panforte Candies

Roasted Beet Salad with Cinnamon

Today’s recipe is one where you might take a look at the ingredient list and wonder if the elements can possibly work together. Beets and cinnamon? Really?

REALLY.

I’m a beet lover to begin with, but the marinade in this recipe takes them to another level. I first made this dish for a Moroccan-themed gourmet club meeting back in July (it was a hit!), and I’ve been making it a couple of times a month since. I served these beets to my mom during her last visit, and she said she could eat them every day (and then went home and made them for herself because she loved them so much).  The baking time is long but prep is really minimal, plus this is one of those dishes you can make a couple of days ahead for less stressful cooking and entertaining.  Give it a try – I’m sure you’ll love it!

Roasted Beet Salad with Cinnamon
Serves 4

Ingredients:
1 pound beets (3 to 4)
2 tablespoons coarse salt
1 tablespoon sugar
Juice of 1 lemon, or to taste
1 tablespoon extra virgin olive oil
Large pinch of ground Ceylon cinnamon
1 tablespoon chopped flat-leaf parsley
Salt to taste

Method:
Rinse and thoroughly dry the beets, being careful not to break their skins. Cut off the tops, leaving about 1 1/2 inches.

Tightly wrap the beets, with the salt, in foil or parchment paper and set in a shallow baking dish. Bake at 325°F for 2 hours. To check for tenderness, open one end of the packet and test a beet with the tip of a knife to see if the flesh has softened.

Peel the beets, cut into bite-sized pieces, and put in a bowl. Combine the remaining ingredients, pour over the beets, and let marinate for 1 hour before serving.  Serve at room temperature.

Source: The Food of Morocco by Paula Wolfert

roasted_beet_salad_w_cinnamon

This is one of my favorite salads, hands down. The beets are perfectly tender, slightly sweet, and bright from the lemon and parsley. The hint of warmth from the cinnamon really elevates the dish as well.  I like to serve this with grilled pork chops, a Moroccan carrot salad (I’ll blog one soon!), and a green salad for a nicely balanced meal.

TIPS: You read that right: two tablespoons of salt. The thing is, in order to use that amount of salt, you absolutely must not puncture the skin of the beets. The “top” of the beet is the stalks of the beet greens, not the beet itself.  If the beet flesh is exposed, that amount of salt will render your dish inedible. (I know this from experience!) If this makes you nervous, just put about a teaspoon of salt into the foil packet with your beets, and then pay special attention when seasoning the marinade later.

Also, I often double this recipe so we have more on hand for snacking. I’ve had success with doubling the amount of beets and using a single portion of the marinade.

Moroccan Vegetable Stew

We’ve been undergoing a bit of a food revolution in our house over the past few months, trying to eat as cleanly as possible (when we’re home and can control it, at least!) in the interest of being our best and healthiest selves. We eat lots of organic meat and eggs, lots of fruit and veggies (keeping the Dirty Dozen organic, at least), and a little organic dairy, and we’ve majorly reduced our beer and wine consumption. It’s been tough, but worth it. Lest you think we’re going crazy, I did bring a caramel apple pie to my friend Christopher’s amazing Thanksgiving dinner and enjoyed every single bite. (Life without any indulgence hardly seems worth living, am I right?) Still, we’re doing the best we can as often as we can.

Changing our lunch habits has been a major challenge throughout this process. I used to alternate between Lean Cuisine and turkey sandwiches; Dr. O was eating the previous night’s leftovers, or (horror of horrors!) Lean Pockets, in the event of an emergency. Since I really wanted to get away from processed food, I bought a bunch of glass Snapware at Costco and committed to stocking my freezer with homemade frozen lunches. I’ve made lots of delicious recipes (I’ll share them, promise!), but today’s recipe – Moroccan Vegetable Stew from Peace Meals – is one of my favorites. There’s a lot of prep work with the veggies, but the stew is really simple and tasty. Plus, the ingredients fill my five-quart slow cooker to the brim, which means I have plenty of lunches to freeze.

Moroccan Vegetable Stew
Serves 6 – 8

Ingredients:
2 tablespoons olive oil
3 cloves garlic, minced
1 teaspoon dried coriander
1 teaspoon dried cumin
1/2 teaspoon cayenne pepper
1/4 teaspoon cinnamon
5 cups vegetable broth (I use organic chicken broth, since that’s what I keep on hand)
2 1/2 cups diced eggplant, about 2 medium
2 cups peeled and sliced carrots, about 5 small
2 cups cauliflower florets, about 1 small head
2 cups sliced zucchini, about 2 medium
1 cup chopped onion, about 1 medium
29 ounces canned stewed tomatoes (I use Muir Glen)
15 ounces canned garbanzo beans
1 cup chopped toasted almonds
3/4 cup currants
1 tablespoon coarse salt
1/2 cup non-fat plain yogurt (optional)

Method:
Heat the olive oil in a medium sauté pan over medium-low. Add the garlic and spices and cook until fragrant, about 1 to 2 minutes; be careful not to burn the garlic. Scrape the garlic and spices into a slow cooker. Add the broth and the remaining ingredients (except the yogurt) and stir. Cook on high for 6 to 7 hours. Allow to cool slightly. Purée 3 cups of the stew in a blender or food processor and return to the slow cooker, stirring to combine. Serve warm with a dollop of yogurt, if desired.

Source: Peace Meals

Moroccan Vegetable Stew

This is such warm, delicious, comforting food. You probably have to like eggplant in order to enjoy this one, but I just adore the way all the vegetables in this dish come together. I also love, love, love the hint of sweetness from the currants and the slight heat from the cayenne pepper.

The first time I made this stew, I was in a huge hurry, rushing to get out the door for some reason. I nearly skipped the almonds since I didn’t want to take the time to toast and chop them. It would have been a huge mistake! I thought it was so strange to put nuts in a slow-cooker stew (surely they would get spongy, right?), but they add such a wonderful texture and flavor to the dish.

TIPS: When I first made this stew, I cut my vegetables into fairly large pieces since I assumed they would cook down quite a bit (especially the eggplant and the zucchini). It didn’t really happen. Now, I use a small dice for the onion, a small-medium dice for the eggplant, and half-moons for the zucchini (and larger carrots). Also, I just put my hand blender right into the slow cooker for a few seconds at the end, rather than dirty my regular blender or food processor.

Slow-Cooked Vanilla Spice Oatmeal

Recently, I received a treat in the mail: a promotional copy of Pure Vanilla, a new vanilla-centered cookbook by Piece of Cake blogger Shauna Sever. As much as I love chocolate, vanilla has always been my favorite flavor, so I couldn’t wait to dig in and check out the recipes. In a cruel twist of fate, we’re trying to avoid eating too much refined sugar and dairy at this point, so I longingly skipped over Vanilla Bean Bread Pudding, Big Mama Vanilla Cheesecake, Salted Vanilla Chip Oatmeal Cookies, and Candied Vanilla Popcorn. I did manage to find a recipe, though, that (a) is relatively low sugar, (b) is made (almost entirely) with things I already had on hand, and (c) solves a problem we’ve been tackling recently, which is that it’s hard to make breakfast every morning with Dr. O’s ever-changing (and sometimes painfully early) work hours.

Shauna says adding a vanilla bean “transforms this humble food (oats) into something otherworldly,” and she’s right. Throw this one together before bed and wake up to one fantastic breakfast.

Slow-Cooked Vanilla Spice Oatmeal
Serves 4

Ingredients:
1 cup steel-cut oats
1/2 vanilla bean, split lengthwise
2 tablespoons light brown sugar (optional), plus more for serving
1/4 teaspoon ground cinnamon
1/8 teaspoon freshly grated nutmeg
1/8 teaspoon ground cardamom
Half-and-half or heavy cream, for serving

Method:
Coat the sleeve of a 5-quart slow cooker with nonstick cooking spray. Place sleeve in slow cooker and combine all ingredients in it; add 3 1/2 cups water and stir to blend. Set slow cooker to low and cook for 8 hours. Remove vanilla bean and scrape any remaining caviar into oatmeal. Stir well and serve with brown sugar to taste and a drizzle of half-and-half or heavy cream.

Variation: Increase the water to 4 cups and add 2/3 cup of dried fruit before cooking.

Source: Pure Vanilla

Slow-Cooked Vanilla Spice Oatmeal

Talk about an incredibly easy, super tasty breakfast. I tried the variation, upping the water to four cups and adding 1/3 cup of dried tart cherries and 1/3 cup of dried apricots. The fruit cooked down to a lusciously soft consistency and the spices were just right. Dr. O said it was like eating cobbler for breakfast (a good thing in our house!).

My only complaint? I lost about a serving of oatmeal to crust on the sides of my slow cooker sleeve, even with a coating of canola cooking spray.  Maybe next time I’ll combine the ingredients in a separate bowl and dump them in to avoid disturbing the cooking spray.  (Or maybe my slow cooker is a bit too warm, even on low?)  I’m very interested to try this as a single serving in my Crock-Pot Little Dipper.  I’ll post an update when I do.

Thanks for the book and the amazing recipes, Shauna!  Can’t wait to try them all.

Honey-Caramelized Figs with Yogurt

You know those kitchen projects you mean to get to, year after year, but never do? One of mine was cooking with fresh figs. I think the problem is that the season is so short; by the time I had a plan, the figs were gone.

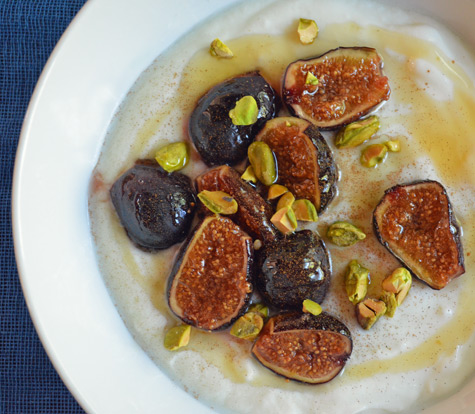
This year, cooking with figs actually had purpose for me. We’ve been focusing on healthy snacks around here lately and have been eating a fair amount of dried figs. I’ll be the first to admit that dried figs and a bit ugly and a bit chewy (particularly if you refrigerate them for freshness), and Dr. O wasn’t crazy about them. When I saw piles of beautiful, fresh figs at Whole Foods last week, I knew I had an opportunity to show him the fruit in its best light. Eight ounces of figs and a quick Internet search later, I had a plan for breakfast: Honey-Caramelized Figs with Yogurt. Dr. O loved every bite!

Honey Caramelized Figs with Yogurt
Total time: 10 min. | Serves 4

Ingredients:
1 tablespoon honey, plus more for drizzling
8 ounces fresh figs, halved (I trimmed the stems also)
2 cups plain, low-fat Greek yogurt
Pinch ground cinnamon
1/4 cup chopped pistachios

Method:
Heat honey in a medium skillet over medium heat. Cook figs, cut side down, until caramelized, about 5 minutes.

Serve over yogurt with cinnamon and pistachios. Drizzle with honey, if desired.

Source: Whole Living, September 2012

Honey-Caramelized Figs with Yogurt

Talk about a delicious and easy recipe! The flavor of the fresh figs was just incredible. They were rich and sweet with pleasant chewiness in the flesh and crunch in the seeds. Add extra crunch from the pistachios, extra sweetness from the honey (necessary, I think, since the yogurt is unsweetened), and creaminess from the yogurt, and you have a tasty, gorgeous breakfast. If I can get to it before figs are out of season, I’ll definitely make this one again.

Recipe link: Honey-Caramelized Figs with Yogurt


The Daring Kitchen

Enter your email address to subscribe to this blog and receive notifications of new posts by email.

Join 555 other subscribers

I want to cook…

Archives